Hoverfly Lagoons. Why we need them and how to make them
By Rosa Goddard

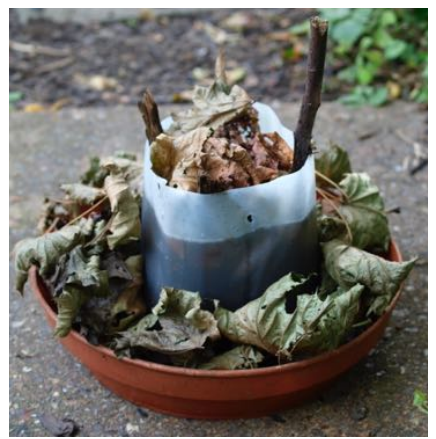
Image by Rosa Goddard
In the UK, there are about 280 species of hoverfly, and they are very important pollinators. Hoverflies are also a good indicator of a healthy environment. As part of our 2026 pollinator action plan, we have been learning how to create habitats that will support hoverflies in Clerkenwell. As discovered from the Clerkenwell Pollinator Path Survey 2025, hoverflies are the second most important pollinator in Clerkenwell (after bees), and the footballer hoverfly is one of the target 10 pollinator insects we are working to support in 2026. There are many great ways to get involved in helping hoverflies, including planting for all pollinators and building hoverfly lagoons! We recently made a hoverfly lagoon to put in the Garden to help promote footballer hoverflies.
Hoverflies are ‘incidental pollinators,’ meaning that as the flies feed on nectar and pick up the pollen as they feed. The pollen is then transferred from flower to flower. There are 2 main types of hoverfly larvae: terrestrial species which live on vegetation and wetland species which can live in a range of wet situations including sap runs, rotting wood and in ponds.
The hoverfly’s lifecycle has 4 main stages. First, the adults lay eggs in a lagoon or on the underside of a leaf (they can lay up to 200 eggs at a time). Then, the eggs hatch and turn into larvae which live in rot holes in trees. After, the larvae become pupa. It can take up to 4 weeks for an adult to emerge from a pupa. The adults then feed on nectar of flowering plants.
Hoverfly lagoons are very beneficial to hoverflies so if you fancy getting involved, please feel free to use the steps below or click here for the Buzz Club method and here for the Bug’s Life method to view the steps we used to make our lagoon.
Select a watertight container (a milk bottle is easiest to cut drainage holes in, but a plant pot can be used as well, however a drill is required for step 2). If you choose to use a milk bottle, cut off the top.
Pierce holes about an inch below the top of the watertight container. You can use a pen if you have chosen a milk bottle or a drill if you have chosen a plant pot. This allows rainwater to drain.
Fill the container with grass cuttings or leaf litter up to the drainage holes. Insert some sticks as shown in the image. The sticks allow the pupa to climb out of the water.
Fill the container up to the drainage holes with water.
Add a layer of leaf litter on top.
Place the container in a tray with drainage holes filled with dry leaf litter for the larvae to pupate in.
Top up the water once a month.